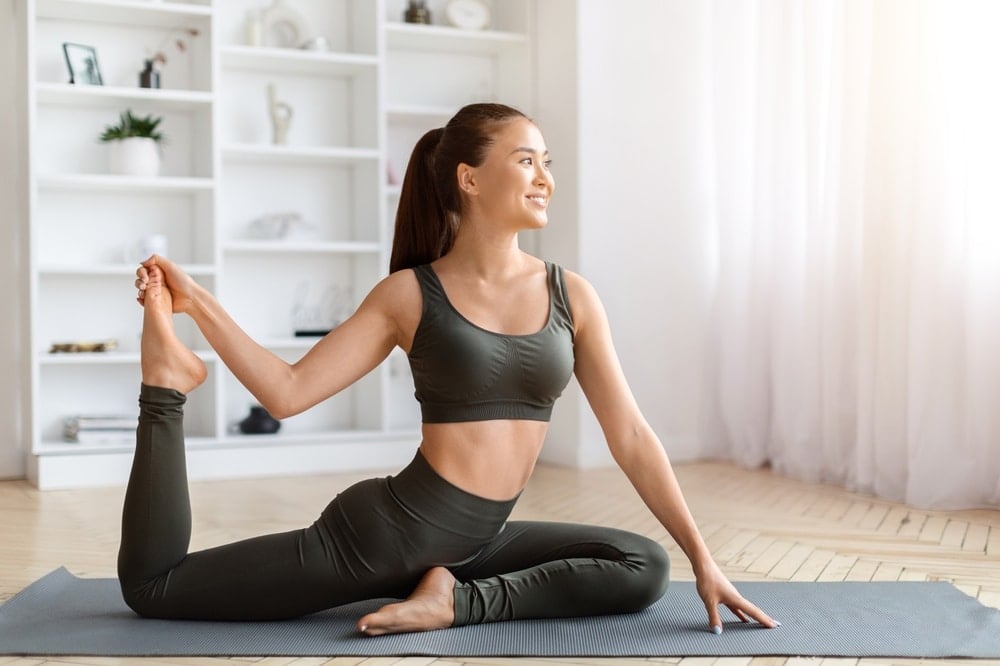
The Mermaid Pose, or Eka Pada Rajakapotasana in Sanskrit, is a captivating and complex asana that brings together elements of flexibility, balance, and strength. It serves as a profound hip opener while also stretching the spine, chest, and shoulders, making it an excellent pose for developing both flexibility and muscle strength.
To successfully practice mermaid pose, a strong foundation is essential, as emphasized by Heather Stants, an experienced yoga and movement expert and the founder of Dance Flow Yoga. Like all advanced postures, entering mermaid pose requires careful preparation and strategic execution.
This guide outlines the proper technique for performing mermaid pose, the numerous benefits it offers, suggestions for modifications or enhancements, and additional insights.
Perfecting the Mermaid Pose Every Time
Commencing mermaid pose involves a thorough warm-up and intentional practice, as advised by Stants.
Prioritizing the lengthening of the hip flexors and engaging in postures that promote back bending, such as camel pose (Ustrasana), is recommended before attempting the complete binding aspect of the mermaid pose (where the hands are clasped at the peak of the pose). Listening to your body and respecting its limits is crucial, Stants notes.
- Begin in downward-facing dog (Adho Mukha Svanasana). Bring your right knee toward your right wrist, placing it behind that wrist while extending your left leg back to set up for pigeon pose (Kapotasana). Strive to align your hips with the edge of the mat.
- Ground your fingertips into the mat as you lift your torso, engaging your core and extending your spine, then gently sink into your hips. Ensure your lower back feels comfortable and that there is no tension in your hips at this phase. If needed, use a block under the hip of the bent leg.
- Slowly bend your right (back) knee, bringing your right heel closer to your glute.
- Reach your right arm back to grasp the inside of your right foot or ankle. Maintain an open chest and keep your gaze directed forward.
- Place your right foot into the bend of your right elbow. If possible, lift your left arm overhead and bring your hands together, creating a “mermaid tail” with your arms.
- To stabilize in the complete form of the pose, engage your core. Remember to breathe deeply—if your breathing turns short or rapid, it may signal discomfort.
- Hold the pose for five to ten breaths, all while keeping your chest open and hips aligned.
- To release, let go of your foot and place your hands by your front leg, then push up into a one-legged downward-facing dog before returning to a full downward-facing dog position.
- Repeat on the opposite side.
Discover the Benefits of Mermaid Pose
1. Comprehensive Stretching for Hips and Shoulders
The mermaid pose provides a profound stretch for the hip flexors, quadriceps, and shoulders, which significantly enhances flexibility. Stants notes that this pose is particularly effective in lengthening the hip flexors, facilitating other back-bending postures, and preparing the body for more intricate poses.
2. Strengthening Core and Back Muscles
This position requires significant core muscle engagement, which in turn builds stability and strength in that area. A well-toned core can result in improved posture, reduced risk of injury, and enhanced capability for everyday activities, such as lifting heavy items.
3. Improved Balance Abilities
Holding this pose necessitates focus and grace, which can ultimately enhance your coordination and balance, aiding in daily actions such as bending down to tie your shoes or maneuvering up and down stairs.
Modifying Mermaid Pose for Accessibility
1. Using a Strap
If reaching your foot with your hands is a challenge, consider using a strap secured around your foot as you work towards the flexibility required for binding. Stants often suggests this modification for students with limited flexibility.
- Start in downward-facing dog. Bring your right knee forward, placing it behind your right wrist, and extend your left leg back for pigeon pose. Align your hips with the front of the mat.
- Press down into your fingertips as you lift your torso, engage your core, and lengthen your spine before settling into your hips. Assess whether your lower back and hips experience discomfort; place a block under the hip of the bent leg if needed.
- Loop a yoga strap around your right (back) foot and gently pull your right heel towards your back glute.
- With your right hand, reach back to grasp the inside of your right foot or ankle, keeping your chest expansive and your gaze forward.
- Tuck your right foot into the crease of your right elbow. If you can, raise your left arm overhead and hold the strap with both hands, creating a “mermaid tail” with your arms.
- To stabilize in the full pose, engage your core, ensuring controlled, even breathing—if your breath becomes rapid or shallow, take a moment to adjust your alignment or exit the pose.
- Hold for five to ten breaths, keeping your chest open and your hips square.
- To exit, release your grip, place your hands down on either side of your front leg, and press into a one-legged downward-facing dog before returning to the standard downward-facing dog position.
- Practice the pose on the opposite side.
2. Adjust Your Front Leg Angle
Widen the angle of your front shin, allowing it to rest in a more natural position, which lessens the intensity on your hips.
3. Skip the Bind
Alternatively, consider a simplified version of the pose by holding your back foot with your hand without binding it in the elbow.
Variations of Mermaid Pose
1. Single-Handed Mermaid Pose
For beginners or those with limited shoulder flexibility, holding the back foot with the opposite hand instead of the elbow bind is beneficial. According to Stants, this adaptation allows for progressive shoulder opening while still providing similar stretching benefits.
- Begin in downward-facing dog. Move your right knee forward to position it behind your right wrist while extending your left leg back for pigeon pose. Align your hips with the edge of the mat.
- Supporting yourself with your fingertips, lift your torso, engage your core, and extend your spine before settling back into your hips. Ensure there’s no strain in your lower back or hips, and use a block under the hip of the bent leg if needed.
- Gently bend your right (back) knee, drawing your right heel closer to your glute.
- Reach back with your right hand to grip the inside of your right foot or ankle, maintaining an open chest and directing your gaze forward.
Once you’re in position:
- While balanced in the pose, ensure core engagement while breathing steadily—quick or shallow breathing may signal discomfort.
- Stay in this pose for five to ten breaths, ensuring your chest remains open and your hips aligned.
- To exit, carefully release your foot, place your hands on the mat beside your front leg, lift into a one-legged downward-facing dog, and then transition back into the standard downward-facing dog.
- Repeat the sequence on the opposite side.
2. Mermaid Pose with Hands Clasped Behind Head
This advanced version incorporates clasping both hands behind your head, allowing for a deeper shoulder stretch. This adaptation enhances chest expansion while also adding further complexity to the pose.strain on your balance, making it ideal for seasoned yoga practitioners.
- Begin in the downward-facing dog position. Bring your right knee forward to rest behind your right wrist while extending your left leg back to adopt the pigeon pose. Align your hips to face the front of the mat.
- With your fingertips on the mat, lift your upper body to engage your core and elongate your spine before settling into your hips. Ensure that your lower back and hips feel relaxed. If they don’t, consider using a block under the hip of your bent leg for added support.
- Slowly bend your right knee, bringing the heel closer to your right buttock.
- Use your right hand to reach back and grip the inner part of your right foot or ankle, maintaining an upright chest and directing your gaze ahead.
- Extend your left arm overhead to grasp your right foot or ankle.
- In this pose’s fullest expression, balance is crucial. Continue to engage your core while maintaining steady breaths—if your breathing becomes irregular or shallow, it could signal discomfort.
- Hold the position for five to ten breaths while ensuring your chest remains open and your hips stay parallel.
- To exit, release your foot and place your hands on the mat beside your front leg. Transition into a one-legged downward-facing dog, then proceed to the classic downward-facing dog position.
- Complete the sequence on the opposite side.
3. Mermaid Pose with a Forward Bend
Incorporating a forward bend in the mermaid pose intensifies the stretch in the hips and enhances the balance challenge.
- Start in the downward-facing dog pose. Move your right knee to position it behind your right wrist, extending the left leg back to form the pigeon pose. Ensure your hips are aligned towards the front of your mat.
- With fingertips providing support, lift your torso to engage your core and stretch your spine before relaxing into your hips. Before proceeding, verify that your lower back is comfortable and your hips are relaxed. If you experience discomfort, you may place a block under the hip of your bent leg for support.
- Carefully bend your right knee, drawing the heel toward your right buttock.
- Reach back with your right hand to clasp the inner part of the right foot or ankle, keeping your chest open and your gaze directed forward.
- Bend your torso forward as far as it feels comfortable.
- Achieving the complete form of this pose requires significant balance. Maintain a firm core and consistent breathing—if your breath becomes shallow or rapid, it may reflect discomfort in the position.
- Stay in this posture for five to ten breaths, making sure your chest is wide and your hips are square.
- To exit, release your foot and place your hands on either side of your forward leg. Lift up into a one-legged downward-facing dog, then return to the regular downward-facing dog posture.
- Repeat the steps on the other side.
4. Mermaid Pose with an Extended Binding Arm
Lengthen the back leg while holding the foot, extending your arm to enhance the stretch through the chest and shoulders. This variation further opens the chest and increases the shoulder stretch, making it ideal for experienced yoga practitioners looking for an additional challenge.
- From downward-facing dog, bring your right knee forward to just behind your right wrist, extending your left leg back to achieve the pigeon pose. Make sure your hips are squared to the front of the mat.
- Press down with your fingertips and lift your upper body to engage your core while extending your spine before sinking into your hips. Ensure your lower back is relaxed and that your hips are free of tension. Use a block under the hip of your bent leg if necessary for support.
- Gently bend the right knee, guiding your heel toward your right buttock.
- Reach back with your right hand to grasp the inner part of your right foot or ankle, while maintaining an elevated chest and a forward gaze.
- Straighten your right leg back as far as is comfortable, keeping your chest open and hips aligned toward the front of the mat.
- In the complete posture, balance takes priority. Keep the core engaged and breathe evenly—if you notice shallow or rushed breathing, it may indicate discomfort within the pose.
- Hold the pose for five to ten breaths, ensuring your chest remains open and your hips are aligned.
- To exit, release your foot and place your hands on the ground beside your front leg. Propel yourself into a one-legged downward-facing dog, and subsequently transition into the full downward-facing dog pose.
- Practice on the opposite side.
Common Mistakes in Mermaid Pose and Remedies
1. Misaligned Hips
Ensure your hips are oriented squarely toward the front of the mat. If they lean to one side, place a yoga block beneath the hip of your front leg to even them out. Stants warns students about the temptation of the bind but emphasizes maintaining proper alignment without rushing into it.
2. Forced Bind
Take your time when entering the bind. If your shoulders or hips aren’t sufficiently flexible yet, focus on the preliminary steps and use props to facilitate your progress.
3. Hyperextension of the Lower Back
Engage your core to prevent excessive arching of the lower back. Instead of merely arching, concentrate on lengthening your spine.
Who Should Practice Mermaid Pose and Who Should Avoid It
Mermaid pose is suitable for:
- Advanced yoga students who have a solid foundation in poses that open the hips and bend the back.
- Individuals seeking to improve flexibility in their hips, shoulders, and spine.
Avoid practicing mermaid pose if:
- You have experienced injuries to the knees, hips, or lower back, as this asana places stress on these areas. Stants notes that “someone with a low back, hip, or knee injury might want to avoid practicing mermaid,” given the intensity of stretching and binding involved.
- You are pregnant or have shoulder instability, as the binding aspect can pose additional challenges and risks.


